|
|
|
|
|
Adjustment of primary and secundary chains |
||

|
Primary chain :
When correctly adjusted, the primary chain will have about 1.25 mm (0.5 inch) free up and down movement on one run between the sprockets, the check being carried out looking through the inspection hole in the primary chain case. The checking is made engine stopped, on different parts of the chain.
A loose chain is tightened by screwing the front one of the two nuts on the adjuster a little forward and away from the eye, and then screwing the rear of the two nuts forward and drawing the adjuster through the eye. This draws the gearbox back in the plates, pivoting on the bottom bolt.
When correct tension is obtained tighten the mounting bolt nuts and recheck the adjustement in case of alteration.
Finally tighten the front nut on the adjuster hard back against the eye to prevent the gearbox being dragged back by the load on the rear chain.
Don't forget to ajust the rear chain.
|
Gearbox 1 - Oil stop 2 - Chain adjustement nuts 3 - Gearbox setting nuts 4 - End of clutch cable 5 - Gearbox oil filling 6 - Gearbox oil draining 7 - Gearbox oil leveling 8 - Engine oil inlet 9 - Engine oil draining
|
|
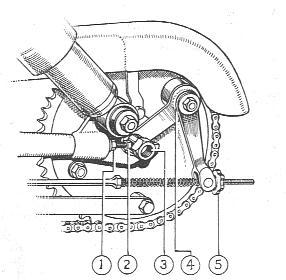
Adjustment of the rear chain is an easy task once the rear wheel spindle (3) and the plate locking bolt are slackened off (nut 3).The brake pin nut (5) must also be unscrewed.
To take up play in a slack chain, the chain adjusters (2), which are screwed into the rear forks ends, must be screwed out to the rear to push the spindle to the rear after loosening the lock nuts (1). Move each adjuster an equal amount. A convenient method is to count the flats on the adjuster heads as they are turned.
Check the adjustment in various positions. Before tightening the spindle and the brake plate locking bolt nut, push the wheel forward to hold the brake plate locking bolt and spindle firmly against the adjuster heads and keep pressure on it whilst tightening. Check the adjustment again in case of alteration, and finally tighten the chain adjuster lock nuts.
The chain must be adjusted so that in the tightest place there is a minimum of 0.5 inch (1.25 cm) free up and down movement on one run.
|
Rear brake and chain adjuster
1 - Lock nut of the chain adjuster 2 - Chain adjuster 3 - Lock nut of the brake plate 4 - Felt join of the brake cam 5 - Adjuster nut of the rear brake
|
|
|
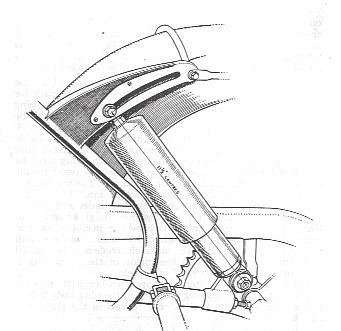
VERY IMPORTANT WARNING : The chain tension increases when the rear suspension gets compressed, because of the different locations of the rotation axis of the rear swinging fork and the driving sprocket. The secundary chain must be adjusted after the combiners have been compressed so that the distance between both fixation bolts is at most equal to 11.5 inches (29 cm).
Never do the adjustment when the bike is on its centre stand. |
Rear suspension half compressed (29 cm) ready for chain adjustment.
|